
The Sagem DTR67xxxT PVRs are a good set of machines. They have their bugs like any other PVR, but generally are good, and reliable, providing you have the latest firmware. I own one, and so do my parents.
The only real problem I have with them is that a vast majority of the firmware is stored on the hard disk. Some is on EEPROM, but the firmware looks quite large so it probably wasn’t feasible to put it on the chip entirely. What this means is that if the drive fails inside your PVR, you cannot simply install a new drive. You usually have the choice of:
- Send the box back and pay a fee, or…
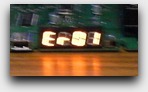
- Void the warranty and install a new drive *when* an Over-The-Air Download is being broadcast for your PVR’s model (which is incredibly rare). All the DTR67xxxT models seem to use the same firmware version. You then have to press OK to both Er07 and Er01, when you see them appear on the PVR’s display, to start the download. It takes about 15-20 minutes and will set you up with a new drive completely automatically.
If you manage to do an Over-Air Download on a new, totally empty hard disk, you will see the following codes appear in order each time you press OK. Apologies for the blurry photos!

Er07 Display
Er01 Display

‘Firmware is Updating’ Display
1-04 counts upwards as the firmware update takes place — it counts faster for older devices than new ones, but the update takes roughly the same amount of time. It usually loops around a few times too from 1-99 to 1-00.
I have read articles around the web of people trying to back up PVR hard disks and being unsuccessful. You can do it with some devices, but the only reliable way to do it is with a sector-by-sector copy.
You need to be very technically minded and PC-savvy to attempt this because a mistake can result in a broken machine.
![]() Warning: Do NOT use a boot CD, such as Ultimate Boot CD for Windows with the PVR drive attached to a PC. I used this CD on a backup of my PVR’s drive, and it took the liberty of ‘Initialising’ the disk — i.e. writing a new Master Boot Record (MBR) right over the top of my PVR’s — which wrecked the contents. I usually trust boot CDs, as they are not supposed to tamper with the contents of attached drives, but it definitely did this without my consent, so you should not use them. This problem occurred either when I simply booted the PC from the CD, or when I opened Computer Management. I was able to validate this was true by viewing the physical sectors on a disk editor — sure enough there was a Windows signature on the disk, an empty partition table, and the last two of the MBR’s 512 bytes had been swapped over.
Warning: Do NOT use a boot CD, such as Ultimate Boot CD for Windows with the PVR drive attached to a PC. I used this CD on a backup of my PVR’s drive, and it took the liberty of ‘Initialising’ the disk — i.e. writing a new Master Boot Record (MBR) right over the top of my PVR’s — which wrecked the contents. I usually trust boot CDs, as they are not supposed to tamper with the contents of attached drives, but it definitely did this without my consent, so you should not use them. This problem occurred either when I simply booted the PC from the CD, or when I opened Computer Management. I was able to validate this was true by viewing the physical sectors on a disk editor — sure enough there was a Windows signature on the disk, an empty partition table, and the last two of the MBR’s 512 bytes had been swapped over.
Please also note:
- You follow my instructions at your OWN RISK. I accept no responsibility for wrecked PVRs, PCs, hard disks or any other losses or fees incurred. These instructions are written in good faith but are not guaranteed to work the way you expect. I can personally say I was successful, but your outcome may vary.
- It is up to YOU to make sure your computer is trustworthy and doesn’t tamper with the PVR disk contents.
- I do not know what will happen if you use this guide to upgrade firmware on a machine that has old firmware.
- You should use a spare computer for this, just in case. Make absolutely sure you are working on the correct drive whenever the PC gives you a choice of what it should erase or image.
- The firmware version in my machine is 1.1.02 MH.
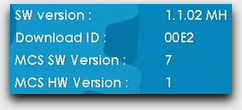
Firmware 1.1.02 MH
Verify You Have the Hardware
You need a hard disk that is guaranteed to be bigger than the drive in the PVR. This is because:
- The free space areas and disk size are logged on the disk itself (as is standard for nearly any file system).
- The firmware appears to be near the end of the drive.
- There is other data at the end of the disk.
So, for example, you’d need a 300GB drive for a 250GB model, to be safe.
You also need a Windows PC with lots of free disk space to do the job. I used Windows 7.
Verify Your Computer Is Suitable
Attach a test disk to your computer. The test disk must be perfectly ‘zeroed’. Active @ KillDisk (the free version) will clear a drive to zeroes completely, or you can use a drive that is fresh out of the factory. Boot up your computer and validate that the drive has not been tampered with by the operating system and is all still zeroes — especially at the start and the end. Active @ KillDisk will let you view a disk’s sectors too. However, most importantly, the ‘Initialise disk’ prompt should *always* pop up when Computer Management is opened for unformatted (and eventually PVR) disks, and this should always be cancelled. If the prompt didn’t come up, or the contents of the disk were altered from zeroes, your PC is tampering with the disk contents and it cannot be trusted to do the job with the real hard disk’s contents.
Remember — I had a PC destroy a PVR’s (backup) hard disk because a boot CD overwrote an important part of it. Don’t let this happen to you.
Remove the Case
Removing the case will void your warranty (obviously)! Again, I will reiterate doing this is at your own risk.
- Disconnect the PVR from its adaptor, and turn off the mains for it.
- Attach an anti-static wristband to yourself and earth.
- Remove the two screws from underneath — they are Torx shaped, size T10. One is under a sticker that says ‘Do Not Remove’.
- Slide the top of the case off towards the rear of the device.
- On older models, you will now need to unplug the fan. Don’t pull on the wires — it can be awkward to remove these tiny plugs correctly. Make a note of which way the fan slots in, and slide it out.
- At the top-right of the PCB (printed-circuit board), there is a grey clip, gently push it aside so the board can be very slightly levered.
- Near the top-left, there is another clip going through the board, which must be gently pushed aside to release the board.
- On newer models, there is a third clip to the right of the hard disk.
- Slide the PCB out from the case — you will need to lever it up very slightly (but not much).
Remove the Hard Disk
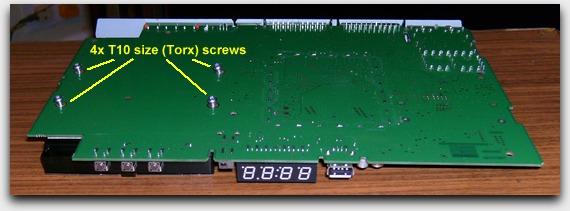
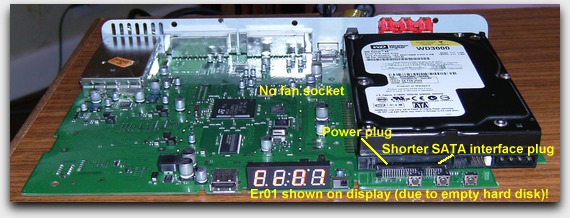
Sagem DTR67xxxT (SATA Model) PCB — Underside
- Turn the circuit board over to see the bottom — there are four Torx T10 screws to remove, so you can separate the drive from the PVR.
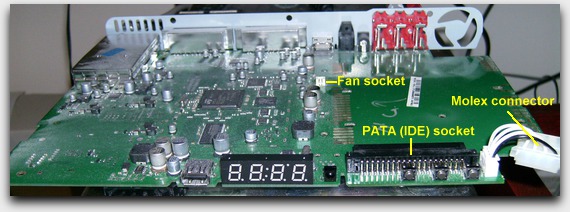
- Hold the drive and the PCB together gently and turn them back over. Slide the hard disk gently out of its connectors.
- On older PATA models, you will also need to remove the Molex (power) connector once you have disconnected the drive from the IDE slot.
- On newer SATA models, both plugs are attached to the PCB, and are much more delicate.
Sagem DTR67xxxT (PATA Model) PCB
Sagem DTR67xxxT (SATA Model) PCB
For reference: If you are tempted to power up your PVR without its case, follow good practice and ensure it is not laying on an anti-static bag, screws, or any other metal or conductive objects.
Back up the Drive (+ Firmware)
If you know someone who has one of these devices, and took an image of the drive during an OAD broadcast, you could try theirs for your new drive, and skip this step if you wanted to. This is the most dangerous step, as the contents of the hard disk MUST NOT BE CHANGED AT ALL. I also can’t guarantee another person’s drive will work on your PVR (I haven’t tried this myself).
Unfortunately, because the firmware is copyrighted, and I respect copyright laws, I cannot upload the firmware for you.
- Attach the drive to a PC as a secondary or slave drive, then power up the PC.
- Do NOT ‘Initialise’ the disk at any point (if you are prompted to).
- Use HDDRawCopy (the portable version) to create a compressed image of the drive. This process can take many hours, especially if you have used the PVR to record things and are not using a fresh drive that’s been created from an OAD!
- Keep an eye on your PC’s disk space. If you don’t have enough room for the compressed image, you might have to do an on-the-fly copy from the old drive to the new (empty) one. This is not recommended.
I have tried many hard disks in both PVRs, with varying power requirements. There was no problem with whichever drive I used, but I would recommend using one with low power requirements anyway.
Write the Image (+ Firmware) onto a New Drive
- Shut down the computer and remove the source hard disk.
- Fit the destination hard disk to the computer.
- Optional: Use Active @ Killdisk to zero the new target drive if you want to guarantee it is blank.
- Use HDDRawCopy to write the compressed image onto the new hard disk.
Refit the Drive
- Refitting is the reverse of removal.
- Verify the new drive fits properly and doesn’t touch or short any of the components on the board.
- Hold the drive in its connectors when screwing it to the PVR’s board.
- On PATA models, the screw holes allow movement for slightly different drives. Hold the drive in the socket as you screw it in, and be careful not to bend any of the pins.
- Don’t forget to plug in the fan if there was one!
Boot the Device
- Verify your PVR now starts up correctly.
Reformat the Drive
- If you’re adding a new disk, and don’t mind losing your recordings, you can format the drive in the machine to try to get the extra space out of your new drive. I can’t guarantee that this actually gives you any extra space — since the usage just says ’0%’ — but I have seen it write data to the far end of the new drive when the format is issued:
- Warning: Formatting a PVR hard disk is dangerous. My tests didn’t wipe my model’s firmware, but I accept no responsibility for the results if you choose to do it. Formatting the drive will erase all the recordings at least.
- Go to Menu > Technical Information > Product Data. Press the hidden key combination: A, Info, B.
- Select ‘Hard Disk’. Be careful not to select anything else.
- Select ‘Format HD’, and answer ‘Yes’ to the French question.
- The recorder will appear to hang — press ‘Back’ every 5 minutes or so to see if it has woken up.
- When the recorder is responding again, switch it off using the power button on the remote.
- Power down the mains. Wait 30 seconds or so.
- Power up the mains.
- Switch on the recorder, you should have a blank recording list.
And that is how you change the hard disk in (or create a firmware backup of) the Sagem DTR67xxxT models!